
 After you’ve worked with any open source project hosted on GitHub for a while, you get used to its particular workflow. Well here’s mine for jclouds but it’s applicable to many projects. This guide will show you how to commit code to a project hosted on GitHub. The guide assumes you’re as least somewhat familiar with git and already have a GitHub account.
Getting the Repo
- Go to https://github.com/jclouds/jclouds and click Fork in the top right hand corner.
- Back on your machine, clone the repo
1.
git clone git@github.com:rackspace/jclouds.git2.cd jclouds - Add a remote to track the master branch of the jclouds repo (and call it “upstream”).
1.
git remote add --track master upstream https://github.com/jclouds/jclouds - Rebase the changes from upstream just to try it out. I include –tags because jclouds manages their patch releases with tags.
1.
git pull --rebase --tags upstream master - Build jclouds for an Eclipse dev env.
1.
mvn clean install eclipse:eclipse -Dmaven.javadoc.skip=true -DdownloadSources=true -DdownloadJavadocs=true -DskipTests
In my case I’m working out of a Rackspace repo so the fork lives at https://github.com/rackspace/jclouds
Before You Write a Line of Code
It’s always a good idea to let the jclouds community know what you’re up to before you write a line of code. Maybe you want to add a new API or Provider so it’s best to give the community a heads up before sending a massive pull request. The best ways to do that are: open an issue in GitHub, send an email to the jclouds-dev mailing list, or hit up #jclouds on IRC on Freenode.
Day to Day Workflow
- Starting on my master branch, I always rebase to make sure I’m up-to-date.
1.
git pull --rebase --tags upstream master2.git push - Start a new branch for a new feature.
1.
git checkout -b rax-clb-monitors - Go off and write some code.
- When you’re done, check to make sure you changed what you thought you changed. Remove and superflous changes.
1.
git status2.git diff - Run the tests.
1.
mvn clean install - When it runs clean, add everything in prep for the commit. Double check it’s all there.
1.
git add .2.git status - Commit the code to your local branch.
1.
git commit -m "The Health Monitor API for Rackspace Cloud Load Balancers." - After your commit it’s time to see if there have been any changes to jclouds upstream.
1.
git pull --rebase --tags upstream master - Once everything is clean and has been merged, push the code to a remote branch in your forked repo.
1.
git push --set-upstream origin rax-clb-monitors - Time for some GitHub action. Go to your forked repo. In my case it’s 1. https://github.com/rackspace/jclouds
- You should see a convenient little Pull Request button now. Click on it.
1.

- You’ll be sent to the pull request screen where you can add additional comments. Click Send pull request when you’re done.
- Now you’ll be on the pull request page.
- jclouds has a continuous integration service running provided by CloudBees BuildHive. I’ve seen it take anywhere from 10 minutes to 1 hour to run. Wait patiently. Write a blog post or something.
- Once the continuous integration is complete, someone from the jclouds community should be in touch to do a code review. You’ll be contacted through the pull request comments.
- After the code review, it’s likely you’ll have some changes to make. 1. Go back and repeat steps 3-8.
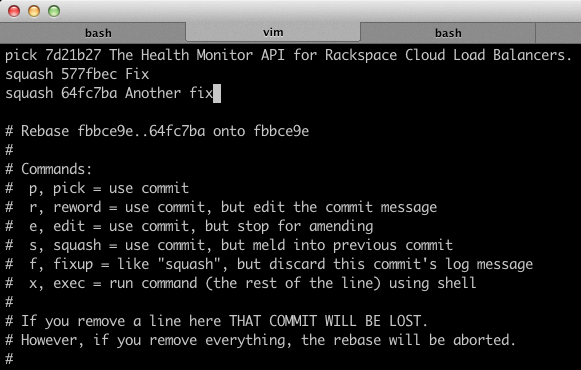
- Now when everything is ready to go again, you’ll have a number of commits to send back. However, to keep the commit history of upstream jclouds sane, you’ll need to squash those commits down to one commit only. In the example below, two commits were made on top of the original commit for a total of 3 commits. Check the git log to make sure your commits are at the “top”.
1.
git log --pretty=format:"%h %an %s"2.git rebase --interactive HEAD~3 - This will open up an editor to start an interactive rebase. You’ll want to “pick” your original commit and “squash” the other commits onto it. Save and close your editor as normal.
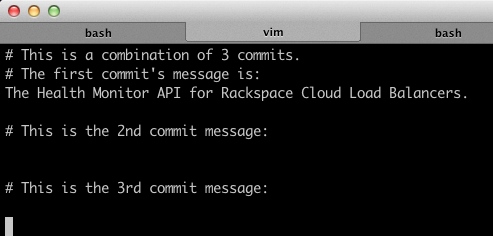
- Now you’ll jump straight into editing your commit message. In this case I opted to just delete the 2nd and 3rd commit messages as they were only fixes and didn’t change the intent of the original commit.
- Everything is clean and squashed now so it’s time to push it back to GitHub. A force push can be dangerous only if there’s more than one person working on a branch. Once you do this your original pull request to upstream jclouds will be automatically updated. Refresh the pull request page if you like. Nothing for you to do except wait for the continuous integration to complete and then go through the code review cycle again.
1.
git push --force - When the code is finally given the green light it will be merged to the upstream master. At this point the pull request page on GitHub will give you the option to delete the brach. Go for it.

- Almost there! Now it’s time to clean up. Switch back to your local master branch, pull down your branch that was just merged to the upstream master, push it to your remote master, and delete your local branch to keep things spiffy clean.
1.
git checkout master2.git pull --rebase --tags upstream master3.git push4.git branch --delete rax-clb-monitors
Coda
Notice how I merge changes from the upstream jclouds repo a lot (git pull --rebase --tags upstream master) to stay up-to-date. This is just good hygiene. The more you merge the less likely you’ll be to run into some catastrophic problem at the end.
I’d also encourage you to check out a tool like the bash prompt builder, that I wrote about in New Tools for JSON and Git. It will let you know, at a glance, the state of your local git repo. This can prevent many unfortunate “GAH! I was in the wrong branch!” type screw ups.
At some point in the future I’m going to forget the details above but have dire need of them in an emergency fix type situation so this guide is as much for me as anyone else. There are some shortcuts I could have taken in the commands above but mostly I did things the long way around for illustrative purposes. If you do know some good shortcuts, please share them in the comments below.